Pages

Monday, October 31, 2016

Paper Temptress Note Cards

Hello, fellow crafty peeps! Today I want to share with you my project using a YouTube Tutorial from PaperCrafter45. Here is the link. It's really very simple. It does call for using the Envelop Punch Board from We R Memory Keepers, however. 
For the base of the card, I used Ivory Feltweave. The spool I used the Emerald Mica/Metallic, and the Copic Blending Papers for the inside of the card and envelopes. I do recommend using lighter weight paper, however, for the envelopes. But I didn't have quite enough of the other to use, and white for these cards was a better color.


This is an absolutely fun set of note cards to make! And I love the Emerald paper I used for them!
Blessings, Jeanie Ellis - Scrapbookingmamaw

Friday, October 28, 2016

Cuddly Cute Designs DT Project

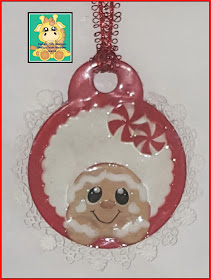
Hello, everyone! And Happy Friday to you! I hope you've got your craft on today! I want to share with you my project from Cuddly Cute Designs, the Ginger Tags. They are adorable! I only chose to make one of them from the group of 4 (yes...there are FOUR!). The reason for it, is because I wanted to do some extra special technique to it. I sure hope you like it! Here is the link to the shop and the tag: Cuddly Cute Designs.

Now on to my project share:
Isn't it just adorable? Be sure to go to the link to look at the rest of the group. This is a paper piecing, meaning I had printed it out on my printer and then cut it out using my Silhouette. I took the front side of my tag and did some distressing to the pieces before adhering them together. After I did that, I placed everything onto the tag and got out my Versamark. I pressed the piece into the Versamark, then sprinkled my Ultra Thick Clear Embossing Powder all over it, heated it, let it cool, and repeated the process 2 more times. 

I then got out a 2nd red section of the tag so I could use it on the back of the tag. I did the same embossing powder process with it as I did the front. Before gluing the 2 pieces together, I took a piece of lace and glued it around the circle edge of the tag. Then proceeded to glue the 2 pieces together. This gave the tag more of an ornament feel to it and more stability. I was very pleased with the results, and hope you like it!

Come on over to the CCD Facebook page and let us see what you come up with! And you can find lots of inspiration there from all the DT's! 

Blessings, Jeanie Ellis - Scrapbookingmamaw

Tuesday, October 25, 2016

Crafty Gals Corner - #95

Hello, everyone! It's time for another challenge over at Crafty Gals Corner blog! This week, #95, is ANYTHING GOES! Here are our sponsors for this week:

Prize ~$10 Gift Certificate


Prize ~ 7 digital images

Prize ~ 3 digital images

For my project this week, I chose the Flapper Twirl Girl from Lemon Shortbread. I love doing tags, so I decided she would be perfect as a Christmas tag. So I colored her with my Prismacolors in Red and Black. I used stickles to glitter up her necklace, earrings, and belt.

I started my tag by cutting a piece of paper that is used in paper packages. It's not really chipboard, maybe more like a lightweight piece of cardboard. I then layer it in 2 sheets of cardstock, embossed it with a clock folder, used a burlap stencil with texture paste, and very fine glitter on top of the texture paste. Once that was dry, I glued my image down. I placed a red poinsettia I had made last year on the top of my tag. Under that, I adhered a sentiment tag. Using my Silhouette, I cut out an impatiens file. Rather than making it into an impatiens, I decided I'd make 3 rose from small to large.

At the bottom of the tag I placed a piece of lace on with hot glue and a double row of pearl strands. On top of that I glued 3 silver glitter snowflakes. 

I wanted her to look like she was going to a Christmas part. I hope I succeeded in that! Please join us in our challenge for this week. Don't think your project isn't good enough! Because we know it is!

I've entered this tag at the following challenges:
Lemon Shortbread - Anything Goes
Crafty Sentiments Designs - Anything Goes
Try it on Tuesday - Anything, using embellishments you made (I made the large poinsettia and the flowers)


Blessings, Jeanie Ellis - Scrapbookingmamaw


Outlawz Color Challenge 10/25/16

Hello, crafty peeps! Today starts a new Color Challenge over at the Outlawz!! This time around, I got to pick what choices we have for the challenge. :-D  First, here's the challenge board inspiration:
Here's what you need to do: Choose any 3 colors. Twist: Must use a Pumpkin Die Cut (punches count), or a Pumpkin Digital image. Now here's my card:
I chose the colors in the board because of the season. I used the white, black, and orange. Now, I realize I didn't follow the "Tic Tac Toe" format, as I wanted the free reign of colors, as long as it was 3 from the board. 

I made my pumpkins from a circle punch of 2 different sizes. I took a piece of white and embossed it with a kind of vine folder. I also used my Big Shot to make the green vines to come out and around the pumpkin. I placed the greenery slightly under the pumpkins and mounted them onto the white piece. I then mounted that onto the black cardstock and then onto the orange base card. I used my Silhouette to trim out my sentiment and added 6 rhinestone embellishments, 3 on to opposite corners. Oh, I also used my Tim Holtz distress ink around the pumpkins and my sentiment pieces. For the pumpkin stems, I just hand cut them out of green paper.

Please come join us over at the Outlawz Color Challenge! We LOVE seeing your projects!!

Blessings, Jeanie Ellis - Scrapbookingmamaw


Friday, October 21, 2016

Cuddly Cute Designs Project

So, here I am today with another creation from the team of Cuddly Cute Designs! I sure hope you've visited them since the last time I posted. They are super cute!! For today's project, I used the Gingerbread House Collection from the Christmas collection. From it, I chose to use the Gingerbread Man. Here is my project....a gift bag or it can be used as a treat bag. My daughter is so into Gingerbread Men that I couldn't resist!!
I used my Prismacolors to color in this little cutie. And to make the bag, I followed a tutorial by Persephone's Papercraft. While I did this bag pretty simply, I thought it turned out very cute. I didn't want too many embellishments on this one. 

I hope you come visit us on our Facebook Page too....lots of ideas there for these digitals!

Blessings, Jeanie Ellis - Scrapbookingmamaw


Cuddly Cute Designs

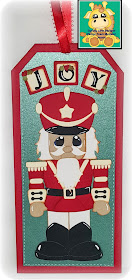
Hello, fellow crafters! Today I want to share with you a project using the Nutcracker by Cuddly Cute Designs. He was my very first paper piecing I've ever done! Once my friend, Kimberly, helped me how to go about it, I was on a roll! And I had so much fun doing the paper piecing! I never realized how much fun it is to paper piece! So before I go on, here he is:
Isn't he cute! What I like about the paper piecing is the fact that he's already colored. I just distressed him up some and put in the "highlights" myself. I used all paper from Paper Temptress: Red Pepper Classic Linen, Emerald Mica/Metallic (isn't it beautiful??), Eclipse Black and some scraps of white and beige I had in my stash. After I put him together and adhered him to the emerald and red pepper, I "stitched" along the edge of the emerald. Tied a ribbon at the top, and he was done! Paper piecing....so fun and so easy!

If you've never tried it before, I encourage you to go over to CCD and give it a shot! They're are super fun and oh, so cute!

Blessings, Jeanie Ellis - Scrapbookingmamaw

Wednesday, October 12, 2016

Crafty Gals Corner #93-CASE it!

Hi, crafty peeps! I can't believe we're into October challenges for this year already! Didn't this year just begin?? Well, be as it may, we're ready for this week's challenge for you! And this week the challenge is CASE It!

What does that mean? It means find a project you like and let it inspire you to create one similar to it! I had never done a challenge like this one before, so it was quite fun to do something different! Now on to our sponsors for this week:
KennyK-Stamps-BADGE-IRockWITH-aqua
Prize: 3 digital images
Digi and clear stamps from KennyK are a fun and edgy way to add the perfect dose of attitude and style to all of your creations! KennyK is a NYC-born professional illustrator who has brought his funky-but-slick, urban-influenced look to the cardmaking and papercrafts world.  His signature style can be seen throughout his various collections of sexy pinup babes, sweet 'n sassy girls, cool rockin' dudes, kid’s stuff, retro characters and more at KennyKDownloads.com.


Miss Daisy Stamps
Prize: THREE WINNERS

1 - Grand Prize of 3 digital images
1 - prize of 1 digital image
1- prize of 1 digital image

These are some great prizes, aren't they? Now onto my card. First, I want to show you the Inspirational card. I tried contacting her, but my email came back. I want to be sure to give full credit though, so I've linked her up here on my blog. 

This card was created by Pat K. Isn't it adorable? Great job, Pat! And thank you for your inspiration! Now on to my card: 
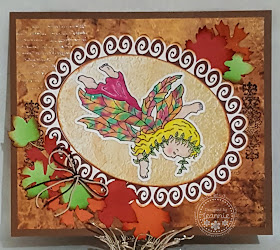
Autumn Blessings by Miss Daisy Stamps

Now, I realize that I can't get it exactly like Pat's, but I wanted to at least get the same "feel" of the card. And I think I achieved that by using the same type of elements in the card. I embossed the top left corner of the card and did some stamping on the card. I also used the digital paper "Just Autumn" from Miss Daisy Stamps digital paper line. That's the paper in the oval frame. I used distress ink around the oval frame. I cut out leaves using my Silhouette, added the corded ribbon, and I was done. I didn't use my Silhouette to color my image, however. I went back to using my Prismacolors. I was happy with the way the colors turned out. I wanted my fairy to be a blonde. :-)  

Come join us! We always love seeing what you create! 

Blessings, Jeanie Ellis - Scrapbookingmamaw


Tuesday, October 11, 2016

Outlawz Color Challenge - October 11th

Hi, crafters!! Here we are with another Color Challenge week over at the Outlawz! I love color challenges! They help me to "step out of my comfort zone". By doing that, I learn new techniques! And this month, our sponsor is Mari Digis Store!
Some adorable images, too! But before I go on to my card, let me show you the inspiration picture: 
Now these are some great Fall colors, don't you think? So here is my card project:

As you can see, I didn't use a lot of black....although I thought I did until I finished it and realized it. But, there is black in it, so that's good. I started by using an SVG window pattern, and colored the "bricks" around the window, then cut it out. I decorated around the window with flat iridescent pearl trim, added my first part of my sentiment, then flanked the window "ledge" with flowers. I also added a couple of small roses on either side of the sentiment. A dotted ribbon was placed onto the left side of the card. Now, because I wanted the window to look more realistic, I used acetate on the inside to give it a "glass". I then added (on the inside), a lace curtain and edging. With my digital, colored with Prismacolors, I put a "rug" underneath her. The twist...add an animal...are her doggie slippers and kitty pillow. I used a rusty printed paper underneath her to act as a wallpaper background. I added a ribbon border at the top and then put in the rest of my sentiment. So the full sentiment reads "Let's Stay in and Get Cozy". She looks cozy, don't you think?

Thank you so much for stopping by! I truly appreciate each and everyone who comes by! And come join us for the new challenge! I love seeing all the talent out there "come to life" with new projects!

Blessings, Jeanie Ellis - Scrapbookingmamaw

Wednesday, October 5, 2016

Crafty Gals Corner Challenge #92

Hello, crafters! It's time for another challenge over at Crafty Gals Corner! This week the challenge is Die Cuts/Punches!

Our sponsor this week is:
Morgan's ArtWorld
Prize: 3 Digital Images

So for this week, I've chosen to do a mixed media project with the digital image Rowan. She's a beauty! I really enjoyed coloring her. Now, as most of you know, I'm not into Gothic or scary, or spooky, so I was trying to figure out how to do her in just the right colors. I didn't want her to appear dark, hence that's why I used the brighter reds, greens, and purples. Here is my finished project:
I've enlarged her so you can see her better. In hindsight, I wish I had put her into the bottom left corner, but...I'm still pleased with the way she turned out. 

I started out by cutting out a chipboard of medium weight, then I took purple cardstock that's in the BASIS paper pack from Paper Temptress, and cut it to the size of the chipboard. I then took 2 different stencils and used my texture paste on them. I sprayed the whole sheet with pearl mist, let that dry, and then sprayed a little green on the floral sections. I had made some homemade mist, so I thought I'd give it a whirl. As it turned out, it was exactly the right colors.

While I let that completely dry, I took my Prismacolors and proceeded to color my image. Once done, I placed her on the upper left corner. Let me back up a bit: I layered 2 pieces of lace in the middle before I placed her down. Ithen used my Silhouette to cut out a flower with leaves, and then my Big Shot for a leafy vine going down from the flower on the top, down toward the bottom. Oh, yes, I had also used my Silhouette to cut out my image.

I added butterflies from Reneabouquets. She hand makes these, so these are a die cut, too. Aren't they gorgeous?? And they matched perfectly! I then added lace and pearls to the bottom of the project, some pearls around in various places, then added some rhinestones and flowers. 

I hope you like it! And stop by the Crafty Gals! We want to see your creations!

Blessings, Jeanie Ellis - Scrapbookingmamaw


Tuesday, October 4, 2016

Autumn Card DT Project

Hi, crafty peeps! Today I want to share with you a card I did for the Outlawz Color Challenge and Paper Temptress using cardstock and ribbon from Paper Temptress. I totally had a lot of fun using my new Silhouette Portrait to not only cut, but to color! I've still got a lot to learn, but hey....I'm getting there! ;-)

I first got out my Orange Fizz cardstock, selected a card cutout, and proceeded to have it cut. Then I colored my image using the Silhouette, and sized it to fit my card front. The image, B86-Love Music, is for the Outlawz Color Challenges of which I'm also a DT with, sponsored by Mari Digis Store.
I cut out the image along with a sentiment to fit my autumn theme for this card. I put in a white cardstock on the inside right of the card, weaved my Forest Green Feather Edge ribbon through the floral cut out along the side of the card, placed black lace inside underneath the green weaving, added some flowers, and she was done! The longest thing that took me was to do the coloring, because I'm still learning that. I hope one day to just whip right through that! Lol!

Be sure to stop by the Outlawz Color Challenges and enter your creation! We love seeing them! And while you're at it, check out the Paper Temptress blog for inspiration, too! 
Blessings, Jeanie Ellis - Scrapbookingmamaw
b866-outlawz-watermark

Saturday, October 1, 2016

Facebook Hop - Cuddly Cute Designs!


Cuddly Cute Designs FB Blog Hop!
Though it's sad to see that warm summer sunshine fade away, let's take a few moments from our weekend to appreciate the beauty that is Fall. Sweaters, leggings and boots, warm apple cider or pumpkin spice ANYTHING, comfort foods, fall colors that make every lake look like an oil painting, HALLOWEEN (however, at my house we celebrate FALL FESTIVAL) and THANKSGIVING...oh and not to mention, more time spend indoors, which in turn means more time to craft! Now if Fall wasn't your favorite season before, it must be now! Since we're spending time indoors as the weather cools off, and we have all these wonderful holidays (and reasons to get creative) coming up, the design team here at Cuddly Cute Designs thought this would be the perfect opportunity for a facebook hop to get everyone's inspiration in check.

Click here to find my FB page. Here is my project for this hop:

I used the Nutty Bunch set for my card. Isn't it adorable?? I used my new Silhouette not only to cut it out, but to color it. Background paper, leaves, squirrel...everything. I love how CCD makes the digitals so a crafter can work it this way. :-)

Now on to your next stop over at Jenni's page...Make sure you stop at each page and comment along the way, you never know what kind of surprises lay in store at each stop! One lucky fan/participant will win $10 (at the sale prices) in Cuddly Cute files!

In case you get lost along the way, here is a list of all the hop stops:

In addition to all the inspiration you'll gather while hopping, we also have some BIG NEWS for you! We've kept this secret for much too long...Cuddly Cute Designs will now be releasing file in DIGI STAMP (png format) as well! Formerly hosted over at The Scrapoholic Candy Shop, these stamps will now be found right on our main page (www.cuddlycutedesigns.com). How exciting! Make sure to invite your friends! Have them post on the first hop post (on the Cuddly Cute Designs page) "Invited by____your name____". The person who invites the most friends will win $5 (at the sale price) worth of the BRAND NEW digi files.

Thank you for Falling in Love with Fall all over again with us. We hope you like what you've seen and find some of your very own crafty inspiration. Good luck to all participants. Please make sure you've followed the instructions to be able to qualify...and remember, we love seeing what our fans create too, so be sure to share your projects over on the fan page. :)